
So for a quick recap, in order to get nice, smooth walls on your Hyrel 3d print, you have to keep in mind pulses per nanoliter, feed rate, prime and unprime settings (steps, speed of steps, time), fan settings, flow rate, head temperature, and bed temperature.
In order to demonstrate how all these settings work in concert, I worked to dial in a filament I had never used before: Colorfab’s ngen copolyester filament. it’s an interesting filament that prints well right around 220c with a 58c-ish heated bed and 20% fan! After setting head temp, bed temp, and fan speed, the next thing I usually examine is the pulses per nanoliter and feed rate settings.
When the filament comes out of the head of the Hyrel onto the glass bed, it should be a solid line that doesn’t look too fat, like you would expect to see on most 3d printers. However, if the pulses and feedrate are off, then you will either see
- A dotted line where the extruder is dropping little bits of plastic along the path
- A nice solid line that looks incredibly fat, like there is too much material being extruded.
For example, here’s a great gif that displays a printer printing good, solid lines of plastic:

It turned out that the Co-Polyester filament liked .89 pulses per nanoliter and a feedrate of .75!
Now, I turned my attention to the prime and unprime settings! These settings allowed me to make sure the walls of my test print didn’t have any blisters or bumps. If the unprime settings are set too high relative to the prime settings, the extruder will start to underextrude like this:
Also, if the prime setting is too high relative to the unprime setting, the printer will overextrude like so:

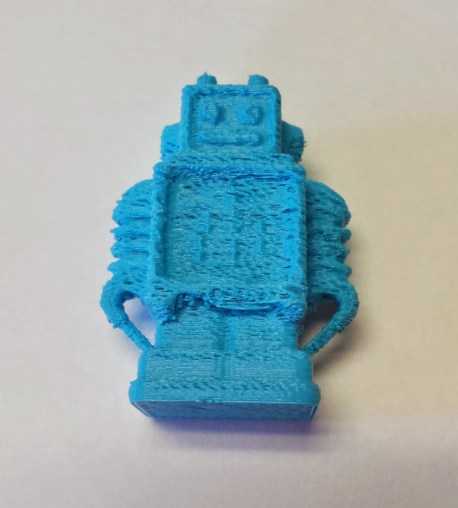
To see underextrusion or overextrusion, you have to watch the surface of the print very carefully and adjust the correct settings based on what is happening! The Ngen filament ended up liking its prime settings at 120 steps, 10,000 speed, and 33 ms of pause time. The unprime settings for the Ngen filament ended up being 110 steps, 10,000 speed, and 20 ms of pause time. After fixing all that, I got a decently good result:
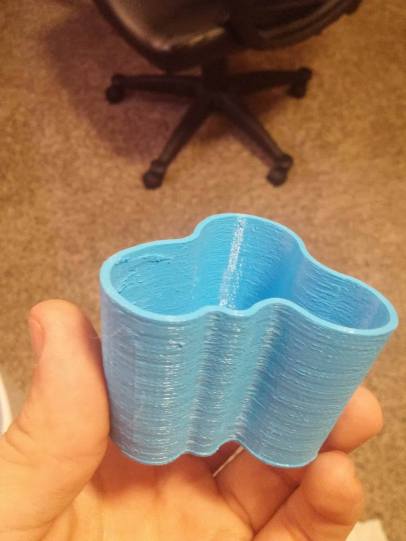
The surface finish wasn’t quite what I wanted though, so I figured out I had to drop the flow rate of the material in slic3r to .9 from 1.0! That made a world of difference for sure.
Edit (7/7/16): upon running some more tests, it doesn’t seem like the flow rate of the material in slic3r did too much…. I’m still evaluating what changed to make the print better on the second run
So, that’s really all there is to dialing in filaments! More to come from my Hyrel printer soon.
John (aka the Mad Printer)
